Deno Scripting

Have you ever felt like you’re making too many shell scripts? Some may say that every line of bash is too much bash.
An example of why bash may be not the best solution for writing scripts is shellcheck. There are too many possible mistakes.
In the last few years I have been experimenting with different scripting languages, and I think I have found a few good ones.
A non-exhaustive list is:
You may notice that all of these are using strongly typed languages, and you may rightly ask why. We have type inference in most strongly typed languages. This means that we rarely have to declare the types, we can't all be Java.
In my experience, using strongly typed languages actually helps drive the scripts along. Also since we have a real programming language, we can create abstractions to help doing the correct things. We can also test the code, since we have a built-in test-runner.
Technically you can write tests in bash.
My latest discovery is the typescript runtime Deno. This post will explore a few ways of why you may want to use something like Deno for some of your scripting needs.
Command line parsing
I am sure you have tried parsing command line arguments in bash. This is surprisingly difficult and error prone.
How can we do this in deno? In short; we use Cliffy.
First we need to add this dependency:
deno add "jsr:@cliffy/command@^1.0.0-rc.7"
Deno will now create two new files called deno.json and deno.lock in the working directory.
Create a new file called args.ts and paste the following code into your favourite $EDITOR.
import { Command } from "@cliffy/command";

type Options = {
  verbose: unknown[];
};

await new Command()
  .name("args")
  .version("1.0.0")
  .option("--verbose, -v", "set verbosity level", { collect: true, default: [] })
  .action((opt: Options) => {
    const verboseLevel = opt.verbose.length;
    console.log("Verbosity level is", verboseLevel);
  })
  .parse(Deno.args);
Test it out by running it:
deno run args.ts
Verbosity level is 0deno run args.ts -v
Verbosity level is 1deno run args.ts -vvv
Verbosity level is 3Error handling
Lets try running this with an incorrect option.
deno run args.ts -vs
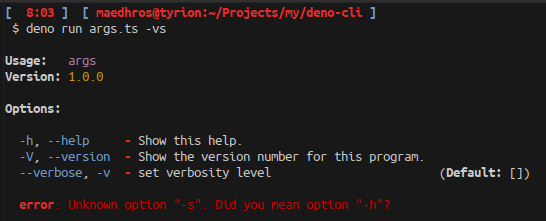
This is a quite nice error message!
We can immediately see what we did wrong, and we get a nice help screen.
But can we improve this?
We cannot say that the type Options has a lot of useful information, we are using an
unknown array here, which is not really anything useful. Let's refactor this a bit.
Let's call this new file args1.ts.
import { Command, EnumType } from "@cliffy/command";
enum Level {
off = "off",
error = "error",
warn = "warn",
info = "info",
debug = "debug",
trace = "trace",
}
type Options = {
verbose: Level;
};
await new Command()
.name("args")
.version("1.0.0")
.type("level", new EnumType(Level))
.option("--verbose, -v <level:level>", "set verbosity level", { default: Level.off })
.action((opt: Options) => {
const verboseLevel = opt.verbose;
console.log("Verbosity level is", verboseLevel);
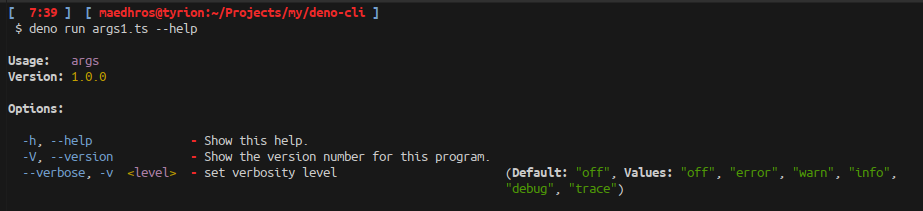
}).parse(Deno.args);Now we can immediately see an improvement in typesafety, and we get the possible levels available in the help output. Let us test this out:
deno run args1.ts --help
Reusable Commands
Expanding on the previous section, we can improve the usage of the command defined there.
Let's modify args1.ts into a new file args2.ts:
import { Command, EnumType } from "@cliffy/command";

export enum Level {
  off = "off",
  error = "error",
  warn = "warn",
  info = "info",
  debug = "debug",
  trace = "trace",
}

export type Options = {
  verbose: Level;
};

export const args = new Command()
  .name("args")
  .version("1.0.0")
  .type("level", new EnumType(Level))
  .option("--verbose, -v <level:level>", "set verbosity level", { default: Level.off })
  .action((opt: Options) => {
    const verboseLevel = opt.verbose;
    console.log("Verbosity level is", verboseLevel);
  });

if (import.meta.main) {
  await args.parse(Deno.args);
}
We also now export the Level, Options and args members so we can use the command elsewhere.
Adding the if (import.meta.main) as guard, allows us to still run this as a main function.
Subcommands
This is a pattern in scripting to have multiple executable commands grouped together as a single command.
We create a new file called sub-commands.ts
import { Command } from "@cliffy/command";
import { HelpCommand } from "@cliffy/command/help";
import { CompletionsCommand } from "@cliffy/command/completions";
import { args } from "./args2.ts";

const generate = new Command()
  .description("Generate some code")
  .action(() => {
    console.log("Would generate some code here");
  });

const commit = new Command()
  .description("Commits to git repository")
  .action(() => {
    console.log("Would commit to git repo here");
  });

const sub = new Command()
  .name("sub-commands")
  .version("1.0.0")
  .action(function () {
    this.showHelp();
  })
  .command("help", new HelpCommand().global())
  .command("completions", new CompletionsCommand())
  .command("generate", generate)
  .command("commit", commit)
  .command("exec", args.description("execute program"));

if (import.meta.main) {
  await sub.parse(Deno.args);
}
First we import two built-in commands that grants us shell completion and a help command.
Next we define two new commands, called generate and commit.
Lastly we compose these together to form a new program, combining it with the const args value we created in the previous section.
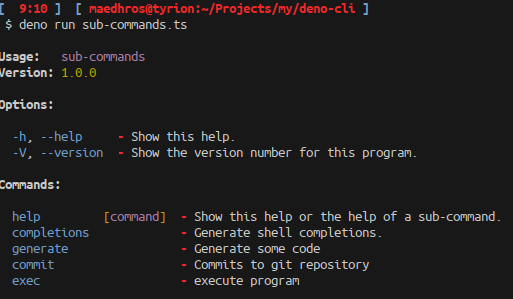
Running deno run sub-commands.ts with no arguments yields:
Shell completion
To use the built-in shell completion in cliffy you have to first activate it.

We need to run the script as a standalone command.
The reason for this is that the completion system expects a known command.
Our name for the command is sub-commands
Here are two different ways we can do that:
- Use a shebang
Prepend #!/usr/bin/env deno to sub-commands.ts then rename it to sub-commands
We also need to make the new script executable
chmod 755 sub-commands
- Compile the program into an executable.
deno compile sub-commands.ts
This will produce a binary for the current platform. Another benefit from compilation is that we also solve the distrbution problem.
Next we need to load the completions into the current shell.
source <(./sub-commands completions zsh)Once this is loaded successfully we can
./sub-commands <tab>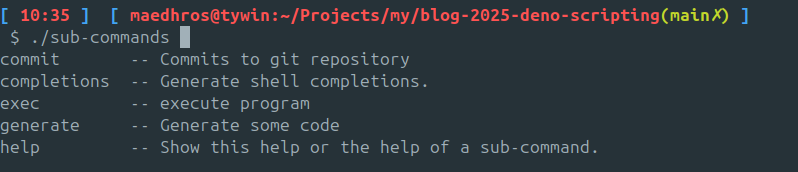
Run an executable (in Bash)
OK. Running a process in bash is really easy. We just do this:
local out=$(foo bar)This will capture the output of stdout into the variable out.
but what if it fails...
We might need to check the exit code of the previously run command.
For bash you need to deal with problem in a intuitive way.
What happens to the output of stderr? Should that also be read into the variable?
Run an executable (in Deno)
const out = new Deno.Command("foo", {args: ["bar"]}).outputSync()
const td = new TextDecoder();
const stdout = td.decode(out.stdout).trim();
const stderr = td.decode(out.stderr).trim();
This is more code than the bash simple case, but we get a few benefits:
- The command, and its scope is clear from the type Deno.Command
- We can capture both the
stdoutandstderr - We can query the exit status by checking
out.success
But this is not everything, we can redirect the output directly into the current process'
stdout or stderr as needed. We can pipe stdout into stdin in other commands, just like in bash.
Take a look at the API for more uses.
Conclusion
I hope this post has inspired you to take a look at other languages for your scripting needs. Deno has a lot going for it, and I think it is accessible for most people. The code for this post is also available as a git repo here
